

Here I am going to show you how to check Cisco and VMware compatibility and how you can install ESXi through UCS manager.
what is UCS manager see.
I was asked to install compatible supported ESXi version 6.7 on below server.
Cisco UCS B200 M4
Intel Xeon E5-2600 v3 Series processor
If you are asked to install ESXi on specific server (here on Cisco UCS) you must check the compatibility. Compatibility simply means we are running supported configuration according to the Hardware (Cisco) and Software (VMware) vendors. The compatibility matrix are updated after they have done their testing of specific server models and particular ESXi version and patches. But this does not mean you can not install ESXi which is not listed in the matrix. Technically you can install but it always better to run within the supported configuration to avoid unforeseen issues and support problems from the vendors.
How to check Cisco compatibility against VMware ESXi.
Go to the Cisco Compatibility Matrix
See the order as below. fill the details of your hardware and select VMware as Operating System will automatically populate the compatible versions.

Open the VMware HCL where you can check all compatibility in one place.
Enter the details as below.
Product Release Version: ESXi 6.7
Partner Name: Cisco
Keyword: UCS B200 M4
CPU Series: Intel Xeon E5-2600 v3 Series processor


This means ESXi 6.7 U3 is supported with UCS B200 M4. Let’s login to VMware site and download the ISO.

Make sure to check md5sum to verify that file is downloaded properly. This will help to avoid unexpected issues when use corrupted ISO file. checksum should be same as VMware site. see how you can check md5sum from your Windows machine.
- Open the Powershell
- Locate the ESXi ISO directory using cd
- Run the below command
Get-Filehash .\<VMware ESXi name.ISO> -Algorithm md5
- Compare the value on the VMware site and make sure ISO has been downloaded correctly.
Let’s start the installation process. here we are using Cisco UCS manager to perform the installation through remote. type the UCS manager IP on the browser.

Launch UCS Manager console and enter the credential as below.

Once you login you will see the consle as below. You should know how to locate the right server from the inventory. To identify the server you should know which chassis and server in this case it’s in server 8 chassis 3.

Once server is confirmed next step would be launching the KVM Console of that node. Due to certificate you might need to click the URL again to open the console. This might not need to do it your environment.

Console looks like monitor. see the below picture.

Next step would be mount the ESXi ISO using virtual CD ROM. First you should activate virtual devices.

Once activated you will see the option available as below. select the CD/DVD option >>> Choose file (select the ESXi.ISO)


Please be sure to click on Map Drive button to mount the selected ESXi ISO.

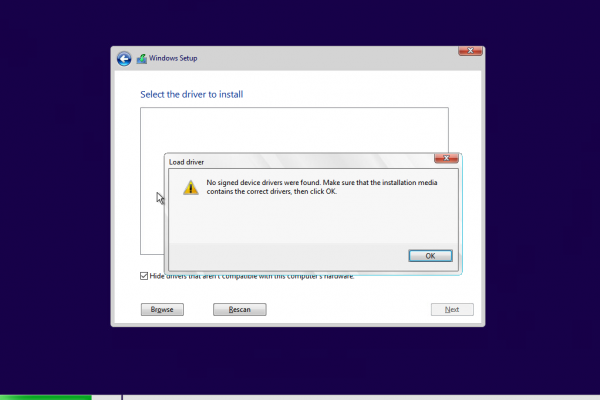
Reboot the node and press F6 to invoke the Boot Menu.

Select the Virtual CD/ROM and enter to proceed the installation. you will see the ESXi installation has popped up as below. Press Enter to continue the steps.

Accept the EULA by pressing F11

You will have to select right disk where you want to install ESXi. May be you might see few disks and remote LUNs here. make sure to select the right one with right capacity. Here I was asked to use BFS LUN which has been presented by the storage via FCOE protocol.

Press enter to continue and will take sometime to gather the disk details.

In my case ESXi is already installed on this LUN so it was detected. You will be asked to choose Upgrade or Install. If you are install ESXi first time this won’t show here and directly jump in to password section as below.

Select the language as you wish and enter the password for root user.


In the last step you will be asked to confirm the Installation. Press F11 to start the installation.


This is how ESXi can be installed over the UCS manager on Cisco blade. Reboot by pressing enter and configure the management IP to access the host.
Thank you for reading.